


Lesson 3, "Symbols," taught you how to work with graphic symbols and instances. Symbols can also include instances of other symbols and animation. In this section, you create a symbol that shows the photograph moving to the refrigerator door at the beginning of the movie.
You begin by creating a movie clip symbol and then adding other symbols to it. A movie clip symbol is like a self-contained movie that you can place in a host movie as if it were a single object. It can include animation and interactivity just like a regular movie.
Note: While working in Flash, it's often useful to undo your actions. Flash can undo several of your recent actions. Choose Edit > Undo (or press Control+Z (Windows) or Command+Z (Macintosh)) repeatedly to step backwards through your recent actions. Choose Edit > Redo (or press Control+Y (Windows) or Command+Y (Macintosh)) to step forward through actions you've undone.
| 1 | Choose Insert > New Symbol. |
| 2 | In the Symbol Properties dialog box, enter the name "INTRO - ANIMATION." |
| 3 | Select Movie Clip as the behavior and then click OK. |
| Flash switches to symbol-editing mode. Symbol-editing mode looks almost exactly the same as movie-editing mode. Notice that the name of the symbol you're editing appears in the top left corner above the Timeline. The name also now appears in the Library window.
|
|
| 4 | In the Timeline, double-click the existing layer name and enter "Photo."
|
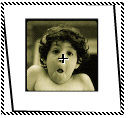
| 5 | Drag an instance of the INTRO - PHOTO symbol from the Library window and place it over the registration point in the center of the Stage as shown in the picture that follows.
|
| This adds an instance of the INTRO - PHOTO symbol to the INTRO - ANIMATION symbol. | |
| Use the arrow keys to move a symbol one pixel at a time. Press Shift and use the arrow keys to move ten pixels at a time. | |
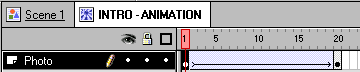
| 6 | In the Timeline, select frame 20 in the Photo layer and choose Insert > Keyframe.
|
| Because you want the animation to begin off the Stage, you must define a new position for INTRO - PHOTO in the first frame. | |
| 7 | Select the keyframe in frame 1. |
| 8 | Move the instance of INTRO - PHOTO about two inches to the right of the registration point. |
| The exact location is not important.
|
|
| Now that you've positioned the image for the first frame, you can create a motion tween to make it move to the position of the keyframe in frame 20. | |
| 9 | Making sure the keyframe in frame 1 is still selected, choose Insert > Create Motion Tween. |
| The Timeline should now look like this:
|
|
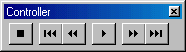
| 10 | Choose Window > Controller to open the Controller and then rewind and play the animation to see what you've done so far.
|
| The photograph should slide in from the right and stop on the symbol's registration point. | |
Now modify the motion tween to make the photograph fade in and rotate as it moves. You do this by specifying an alpha (transparency) setting of 0 in the keyframe where the photograph first appears, and by setting the number of rotations in the Tweening Properties dialog box.
| 1 | Select frame 1 in the Photo layer. |
| 2 | On the Stage, select the instance of INTRO - PHOTO and choose Modify > Instance. |
| 3 | Click the Color Effect tab in the Instance Properties dialog box and choose Alpha from the Color Effect pop-up menu. |
| 4 | Move the Alpha slider to 0 and click OK. |
The photo becomes completely transparent (invisible). Only the selected border is visible.

|
|
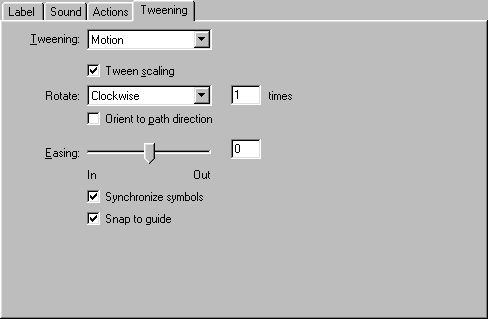
| 5 | Make sure that the keyframe in frame 1 in the Photo layer is still selected, choose Modify > Frame, and then click the Tweening tab. |
| 6 | Choose Clockwise from the Rotate pop-up menu, enter 1 in the Times box, and then click OK.
|
| 7 | Use the Controller to rewind and play the animation. |
| As the motion tween moves the symbol instance, it also rotates the image and changes the alpha settings between 0 and 100 to make the photograph fade in. | |
| Next, add the crown magnet to the top of the photograph. | |
| 8 | Select the keyframe in frame 20 in the Photo layer, and then drag an instance of the INTRO - CROWN symbol from the Library onto the photograph.

|
| 9 | Rewind and play the animation to make sure it works correctly. |
Add a frame action to stop the animation
Although the animation you've created appears to stop at the last frame while you're in symbol editing mode, it will work differently when placed in the movie Timeline. Movie clip symbols loop as long as a movie plays unless you make the movie clips stop.
Add a frame action to make this animation stop when it reaches the last frame.
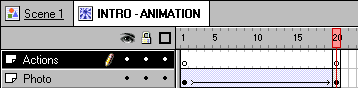
| 1 | Select the Photo layer in the Timeline, and then choose Insert > Layer. |
| 2 | Double-click the layer name, and then enter "Actions." |
| 3 | Insert a keyframe in frame 20 in the Actions layer, and then choose Modify > Frame.
|
| 4 | Click the Actions tab in the Frame Properties dialog box, click + (plus), and then choose Stop from the Action pop-up menu. Click OK.

|
You've now completed the INTRO - ANIMATION symbol.